
Dahlia 'Cafe Au Lait' Bulb
Dahlia 'Cafe Au Lait' Bulb
Zone compatibility details
Understanding the Prices on Our Product Pages
When shopping on our site, you might notice different types of prices listed for products. Here’s a quick guide to help you understand what each price means:
Regular Price
The Regular Price represents the price before any discounts. This price typically reflects the median price from the past 90 to 180 days, depending on product category, excluding special promotions like holiday sales, limited-time deals, multi-unit deals, and clearance events.
Now/Sale Price
This is the updated price of an item after a reduction from the regular price. The Now Prices are often limited to a short time frame and offer the opportunity to save on products you love.
MSRP
Also known as the Manufacturer's Suggested Retail Price (MSRP), this price is provided by the manufacturer. It serves as a benchmark to highlight the value of our current pricing.
Discount Exempt
Products labeled discount exempt are not eligible for discounts or promotional offers.
Please note that product prices are subject to change without notice.
Couldn't load pickup availability


Zone
7 - 10

Mature Height
48 in

Mature Width
48 in

Light
Full Sun
Water
Moist, well-drained
Soil
Normal, loamy, Sandy
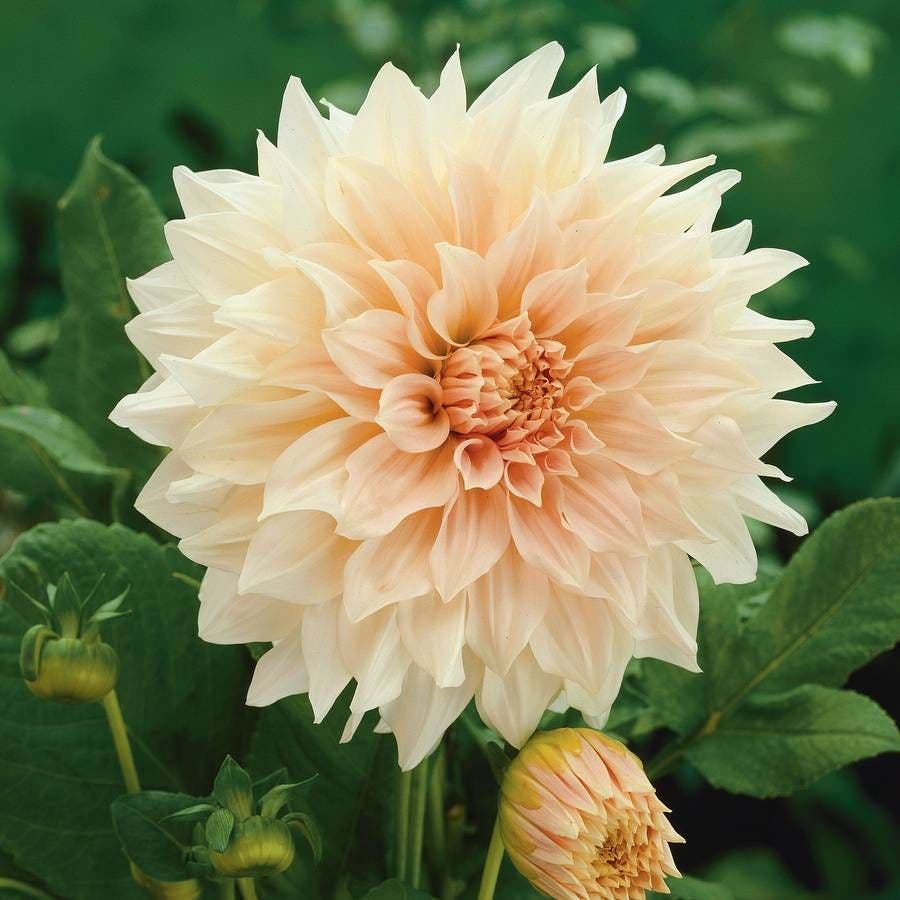
Description / Dahlia 'Cafe Au Lait' Bulb
Cafe au Lait Dahlia stands as a pinnacle of elegance in the floral kingdom, embodying the essence of sophistication with its dinnerplate-sized blooms. This variety, renowned for its luxurious cream, blush pink, and subtle latte brown hues, transforms any garden into a showcase of midsummer to fall splendor. The Cafe au Lait Dahlia is not just a flower: it's an experience, offering an unparalleled aesthetic appeal that is both eye-catching and soul-soothing. Its grand blooms, rich in color and size, are a testament to nature's beauty, making it a coveted choice for wedding bouquets and upscale floral arrangements. Truly, this dahlia reigns supreme in the realm of cut flowers.
Planted in spring, these dahlia tubers promise a season filled with breathtaking beauty. The dinnerplate Cafe au Lait variety is especially prized for its significant bloom size, ensuring that each flower stands out as a natural masterpiece in your garden. As a bonus, these magnificent flowers attract butterflies and hummingbirds, adding a lively buzz to their serene beauty. For those eager to witness this floral marvel, pre-order is available, with ships in spring ensuring your garden is set for a dazzling display.
Growing the Cafe au Lait Dahlia is not just about adding a flower to your garden; it's about inviting a touch of class and elegance. The planting information provided ensures success, guiding you to place your dahlia tubers in a sunny spot where they can truly thrive and become the garden's focal point. From midsummer through fall, enjoy the continuous bloom of these exquisite flowers, each petal telling a story of elegance and beauty.
In summary, the Cafe au Lait Dahlia is more than just a plant: it's a statement of beauty and elegance that elevates any garden or floral arrangement. With its impressive bloom size, delicate colors, and the ability to attract nature's pollinators, it's an essential addition for any gardener looking to add a touch of sophistication to their outdoor space.
Dahlias come in a wide variety of sizes, shapes, and colors. Dahlias are grown from tubers, which are similar to bulbs, so they're easy to plant. Follow our expert's advice on how to plant and care for dahlias in our Dahlia Care Guide. To learn more about dahlias, read our blog All About Dahlias.
NOTE: In Zones 3-7, the bulbs will need to be lifted before the first frost and overwintered inside. However, dahlias can be grown as annuals in all Zones.
Product Details
SKU:
Genus:
Species:
Variety: 'Cafe Au Lait'
Item Form:
Size:
Bloom Color: Cream, Light Pink, White
Foliage Color: Medium Green
Habit:
Light Requirements: Full Sun
Moisture Requirements:
Bloom End:
Uses: Special Features: Hardiness Zones: 7 - 10
State Shipping Restrictions: CA, GU, PR, VI